
This guide was developed in partnership with Frame.io, our preferred review platform.
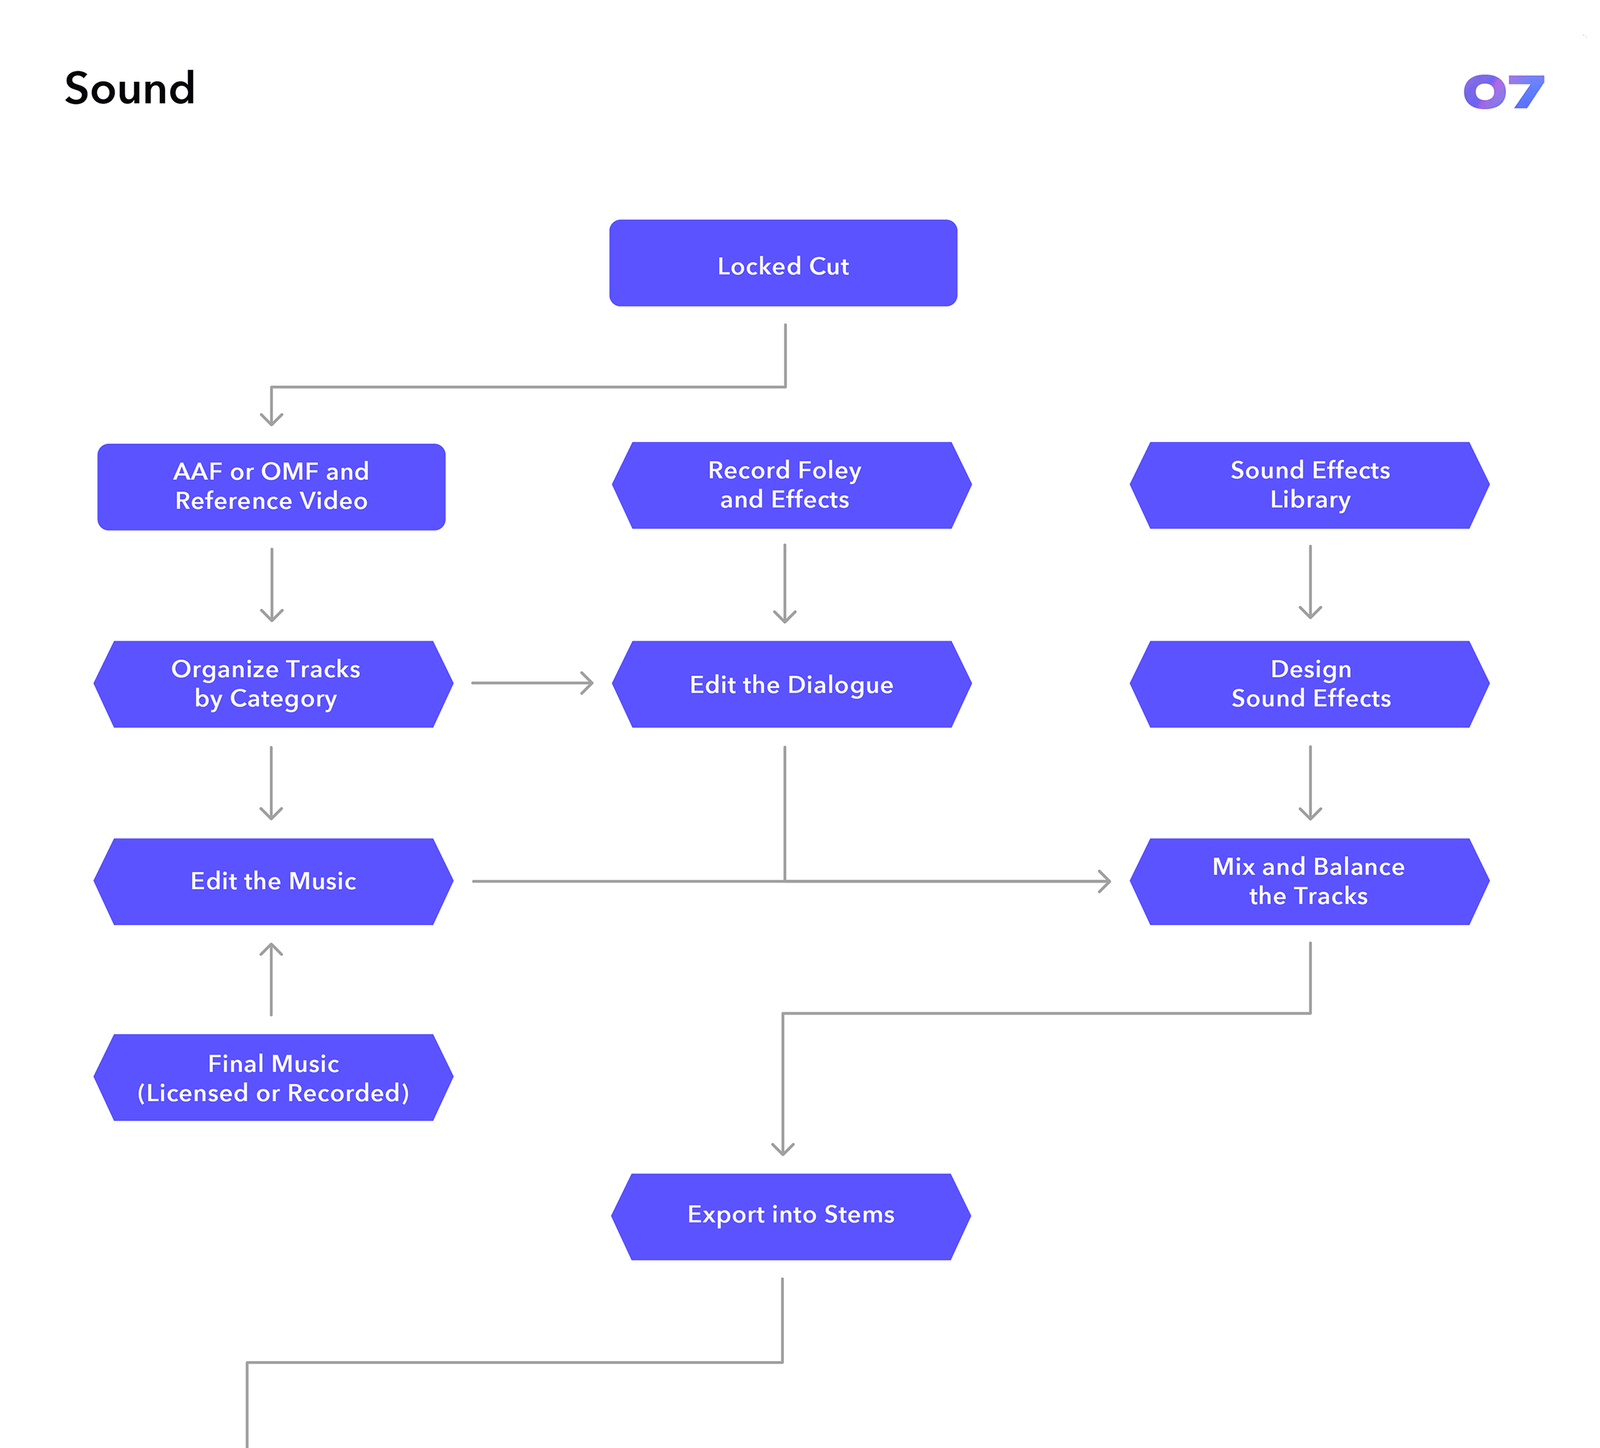
Specialized audio post-production work adds a of lot polish to a project. This part of the workflow can heighten the excitement, intimacy, immersion, and atmosphere of the story. It also ensures the content meets the technical specs of whatever platform it will be delivered on, while sounding its best in any given playback environment. In order to transform the initial materials to the final, polished mix, we need to follow a series of steps:
Materials Needed
Most projects require an OMF/AAF, a quicktime export of the video, and a list of required specs and deliverables. A sound report from the production audio is nice to have if there are multiple mic choices, but not always essential.
What’s an OMF/AAF?
OMF and AAF files are special formats used for transferring projects between different editing programs. They allow post audio facilities to import audio clips from the timeline of your video editing software. It maintains the clips’ relative positioning and fades, along with a few other features, like: panning, volume automation, and sometimes audio processing. Essentially, it is a snapshot of the project in your editing software that can be imported into Digital Audio Workstations (DAWs) like Pro Tools.
OMF vs AAF
Both file types accomplish a similar task – exporting a timeline from one piece of software so it can be imported into another. AAF is a newer format that contains some additional metadata over OMFs (like track names), but not all video software can export AAFs. Regardless, both are completely acceptable ways to transfer materials to post audio.
Export Settings
Exporting OMFs/AAFs is different for every program. Below are program-specific guides for some of the most widely used editing software.
How to export from Premiere
- Select the tracks in your timeline that you would like to include in the OMF
- Go to File – Export – OMF
- You’ll see the following dialogue box with the correct export settings.
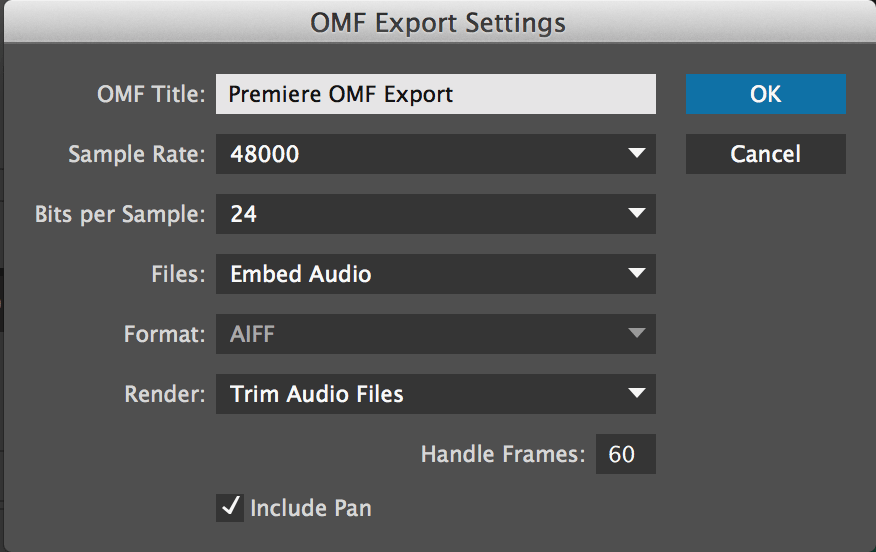
Once you’ve exported the OMF, you are good to send!
How to export from Avid Media Composer
- Select the tracks in your timeline that you would like to include in the AAF
- Go to File> Export >AFF
- Match the settings below in the export settings.
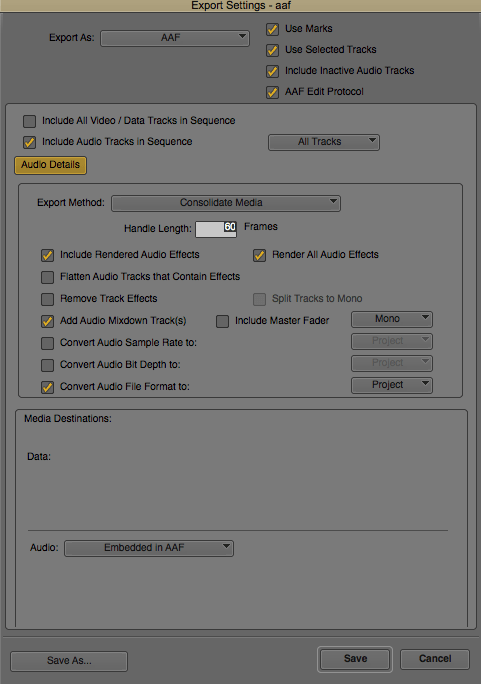
Once you’ve exported the AAF, you are good to send!
How to export from Final Cut Pro X
Click on the Roles Icon and select what you would like to include in the AAF.
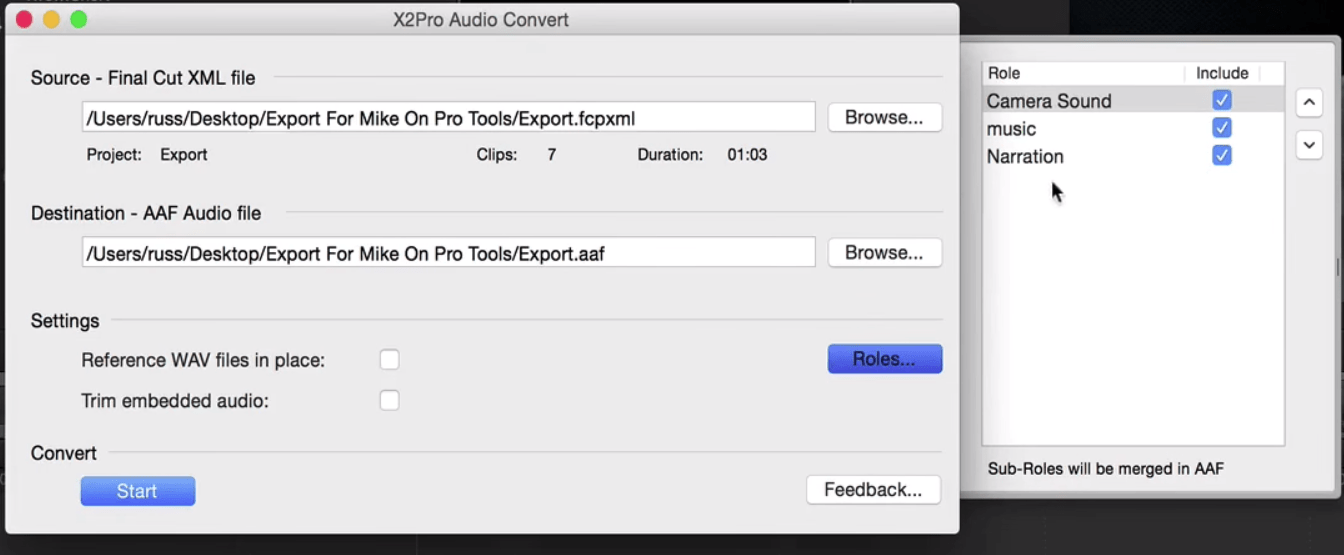
The General tab in the preferences menu should match these settings.

The Media Handling tab should match these settings.

Select “Merge sub-roles into parent” on the Roles tab

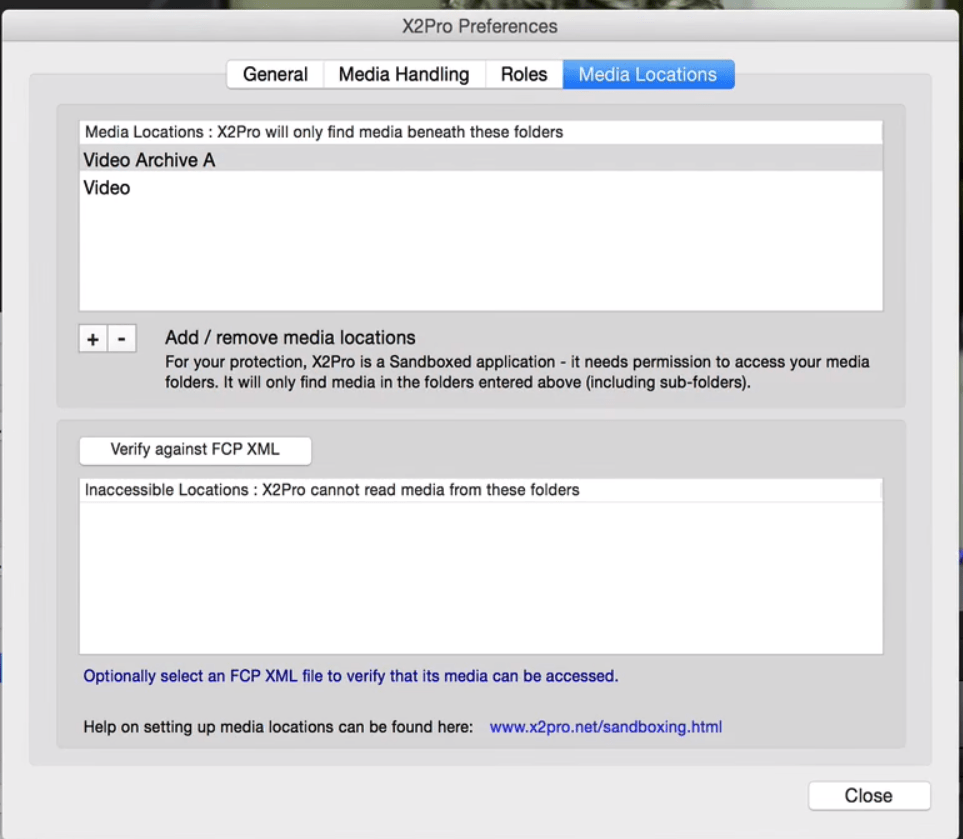
Under the Media Locations tab you can select the folder in which all of your audio assets live, so that x2pro may reference them correctly.
Video Export
Here is a list of preferred video codecs for Pro Tools 11 and higher (as outlined from the Avid Knowledge Base):
- DNxHD (Preferred)
- Apple ProRes 422 (including HQ, LT and Proxy)
- DV25
- DV50
- H.264 (Performance may vary)
720p and 1080p resolution should be sufficient for an audio post facility. This allows the operator to save processing power for audio. 1080p still provides enough detail for your sound designer, and the smaller files will speed up exporting and uploading / downloading.
“Spec” Requirements
Every project has its own special requirements. Here’s a list of relevant info to pass along to post audio to ensure the final mix meets those requirements:
- How the content will be distributed (broadcast television, web, film festivals, specialized installation, etc.)
- What formats are needed for the mix (Stereo, 5.1 Surround, 7.1 Surround, Dolby Atmos, etc.)
- Any other relevant audio specifications (in the case of broadcast television, these specs will usually be contained in a guide from whichever network the spot/episode will be airing on)
Post Audio Workflow
Basic Step by Step Process
Track Management
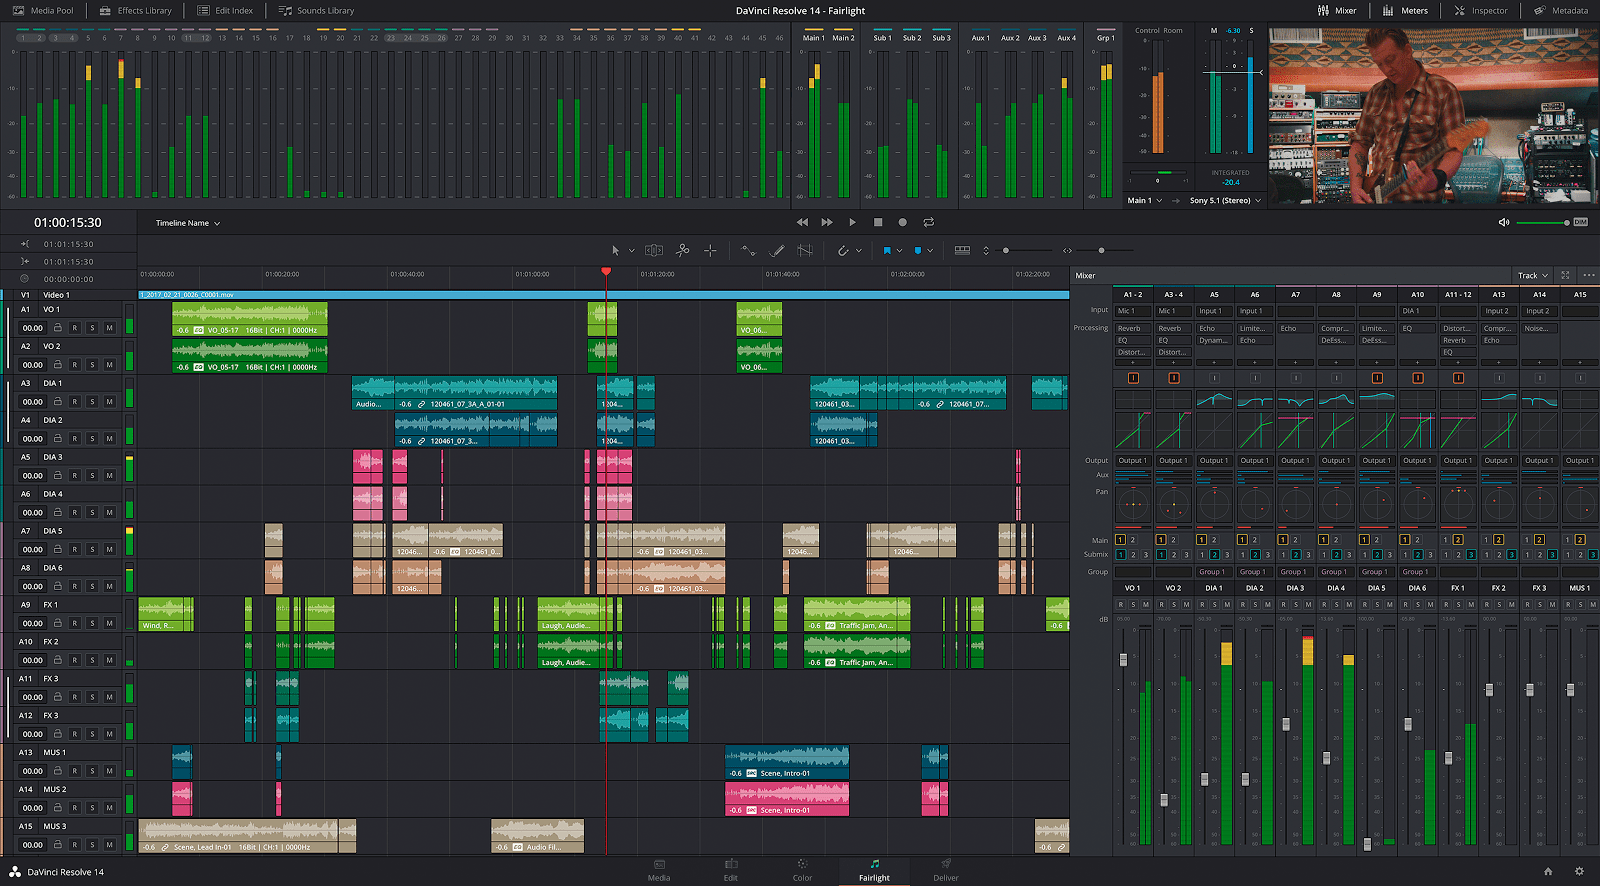
The first step is organizing the audio clips from the AAF/OMF in a digital audio workstation. It’s important for each audio clip to be organized on a track with similar audio clips before the post audio process can continue (dialogue with dialogue, sound effects with sound effects, etc.)
To make this process as quick and smooth as possible, the tracks in the editing software should be labelled and organized before the AAF/OMF is created. It is preferable to send a larger number of well organized tracks, instead of combining different kinds of clips together on a smaller number of tracks.
Categories to organize audio tracks into:
- VO (Voice Over)
- Dialog
- Production Effects (anything recorded from set other than principal dialog)
- Sound Effects (separate from Production Effects, anything that was added in post)
- Music
If you have a mixture of mono and stereo files in your edit, it’s helpful to keep these organized as well. For instance, all mono sound effects should be placed together on tracks above your stereo sound effects.
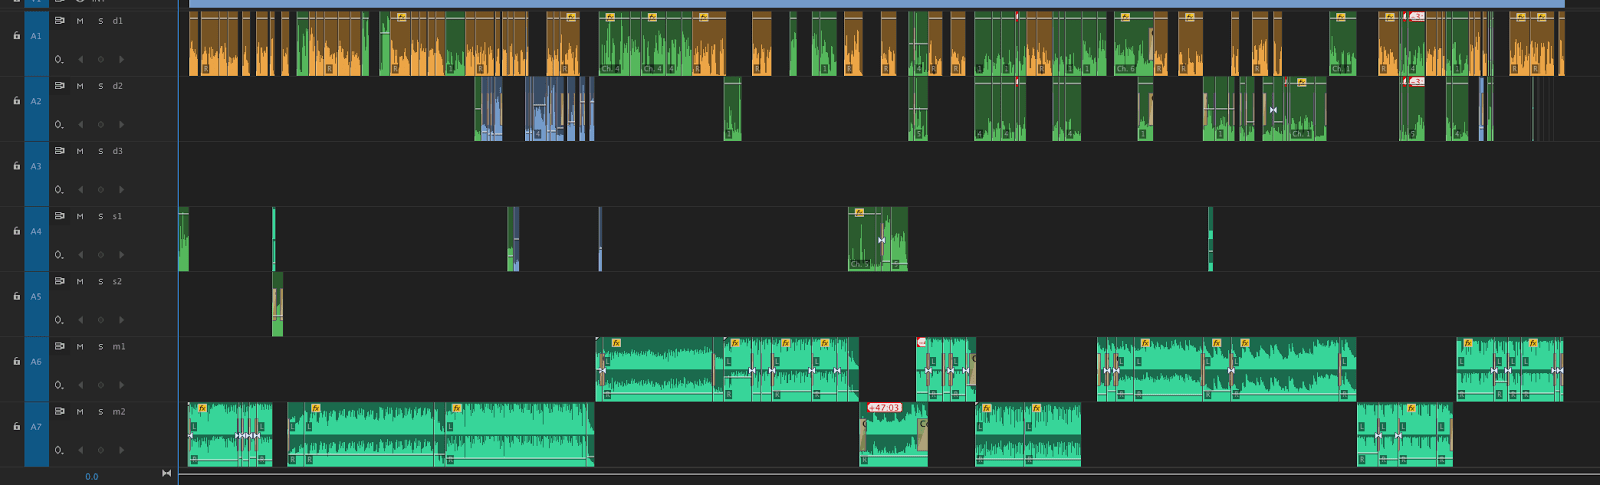
A special note about dialog tracks – it is best to keep all of the different microphone channels from production vertically grouped together. That way, your dialog editor can easily choose the best microphone for each scene. A good minimal track layout includes a boom microphone and a lavalier microphone. An expanded track layout would include Mix Left, Mix Right, Boom, Lav 1, Lav 2, etc.
Dialog Edit
The dialog edit is an often-overlooked but extremely important step of the post audio process. When it’s done right, the dialog track should sound completely natural and unedited.
The Dialog edit is usually the first task after track management because it provides a crucial anchor in many projects. Here’s a quick overview the process:
- Find the cleanest room tone possible from each mic in the scene.
- Use this room tone to bridge dialog bites together and add air for longer fade ins/outs (especially important if the room tone is particularly noisy or loud).
- Smooth out any chopped words or breaths.
- Smooth out any “frankenbites” (Sometimes a word or sentence must be created if rerecording isn’t an option. This is never ideal but is sometimes necessary).
Room Tone
The next step to a clean dialog edit is finding room tone for each of the dialog recordings. As mentioned, room tone is the ambient sound of the environment where a recording was made. When a dialog recording is cut up during the picture edit, gaps are often formed between lines (as shown in the screenshot below):
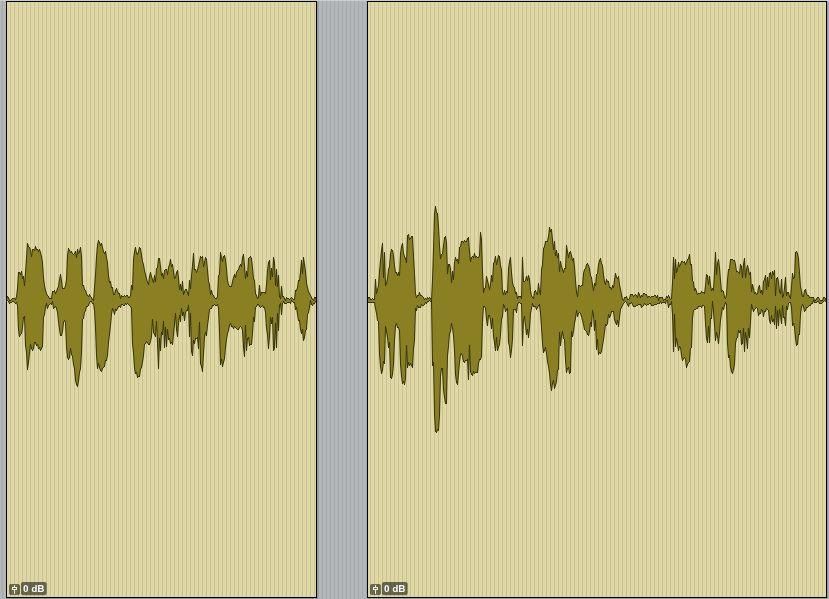
As a result, the ambient noise from that recording pops in and out with the dialog, often to a noticeable degree. Using clean room tone, you can fill those gaps that were created during the edit, creating a consistent bed of noise throughout that piece of dialog:

What makes Room Tone “clean”?
Clean room tone contains the ambient sound of a recording space and nothing else. Cloth rustling, distant car horns, and breaths are common things to avoid in your room tone. For example, if your chosen room tone has a car horn in the background, that horn will be present every time you use that room tone to fill a gap in the edit.
A desirable clip of room tone should be decently long so that it’s easy to work with (depending on your exact uses, anything under 10 frames or so can be problematic). For instance, if you’re filling a three second gap between two dialog bites, looping a 5 frame long bite of room tone can be tedious, and may sound obviously looped to the listener.
There are multiple methods of finding clean room tone. Here we list the most common ways, generally from most desirable to least:
- Room tone recorded by production sound – Sometimes production sound will intentionally record the ambient sound where a dialog recording took place. This is always good to use when available. However, it is worth noting that even minor changes in mic placement can drastically change the sound of room tone. Also, over time, most ambiences will change slightly. It’s always a good idea to do continuous listens to make sure the room tone continues to match a scene.
- Pulling out the handles of dialog bites – Clip handles refer to the extra recording before the start of a clip and after the end of a clip. The picture editor should provide handles for the dialog editor when exporting the OMF/AAF. This allows a dialog editor to pull out the edges of that clip to access the recording around that line.
For instance, say the following clip of dialog was provided in the OMF:

Since the picture editor included clip handles when exporting the OMF, the sound editor can pull out the start of the clip, as shown in the highlighted area below:

The highlighted area appears to be clean room tone! An editor can copy that room tone and paste it wherever it’s needed.
- Splicing together room tone – Oftentimes you won’t be able to find a single stretch of clean room tone throughout the dialog recordings you’re given. In these cases, you may have to take whatever bits of clean room tone you can and “splice” them together into a longer clip of useable room tone.
Other Uses of Room Tone
Room tone is used for more than just filling gaps between dialog bites. Here are someother common uses:
- Fading the background noise of a dialogue recording in/out – If you’re dealing with a particularly “noisy” dialog recording (perhaps it was recorded next to an air conditioner) it can be jarring if that background noise pops in sharply when the dialog starts. To smooth that out, we can use our clean room tone to create a gentle fade in/out of the noise:

- Covering up unwanted breaths/rustles/etc – Sometimes it’s appropriate to cut the natural breaths out of a dialog bite. For instance, if that dialog is serving more as voice over (the speaker isn’t on camera) maybe you want to remove those breaths. Instead of creating harsh cuts out/in to remove the breath, you can replace that breath with clean room tone. This same method can be used for any rustling or other unwanted noises between dialog in the recording.
Using room tone, you should be able to create a full dialog track with no noise popping in and out. Each dialog recording can play in and out naturally by creating fades with that room tone, and ultimately your dialog edits can sound seamless to the listener.
Frankenbites
Frankenbiting (also commonly referred to as franken-edits) is a phrase to describe a line that has been edited together from multiple pieces of dialog. If an interviewee didn’t say the line you want, you may be able to cut together various parts of their recording to “manufacture” that line.
It’s best to avoid Frankenbiting when possible, as it can be difficult to maintain a natural sounding delivery. That said, sometimes it’s needed for the narrative goal of a project. Here are a few tips for creating clean Frankenbites:
- Avoid tonal shifts – One of the clearest examples of a messy Frankenbite is a big tonal shift in the middle of a line. Listeners will notice if a line delivered in a slow, low voice is suddenly spliced together with a fast, higher pitched delivery. Try to find bites that have a similar tonality and delivery when possible.
- Edit on consonants rather than vowels – There are some vocal sounds that are better suited to editing together than others. In general, vowel sounds are difficult to edit together in a natural way. Since vowel sounds feature more tonal content than consonant sounds, any shift in the tonality between the edited lines will be noticeable. Conversely, consonant sounds like esses , th’s , and hard k’s and t’s are easier to cut together naturally. When possible, try to create edit points on consonant sounds rather than tonal, vowel sounds.
- Evaluate if the Frankenbite is worth an unnatural sounding line – While you may technically have the words needed to manufacture a particular line, there may be no reasonable way to make that manufactured line sound natural. If you find this is the case, it may be worth reevaluating how important it is to the overall project to have that line. If it’s essential to your narrative goals, it may be worth having a brief bit of unnatural dialog. If it’s just a small change, that frankebite may not be worth alerting your listeners to a funky edit. Depending on the importance, it may be worth contacting the original actor/VO artist to see if they can re-record the line.
The dialog edit has just as much to do with listening to the space in between the words as it does the words themselves. Ideally, the audience shouldn’t be able to perceive any sudden changes in room tone or cadence. A poor dialog edit makes the post production process negatively visible to the viewer, through awkward jumps in the dialog’s tone or cadence.
How to Choose Dialog Recordings
If the dialog in your project was recorded with multiple microphones, the first step of the dialog edit is choosing which microphone recording to use. Here are a few questions to keep in mind when choosing:
- Which recording has the better “tone”? – Choose the microphone that offers the most realistic and full tone. When possible, it’s good to avoid recordings that sound “tinny” (lacking low frequencies) or “muffled” (lacking high frequencies). Recordings can be enhanced after the fact by using an equalizer or other similar processing, but it’s good to use the recording with the best tone to begin with.
- Is one recording noisier than the other? – Sometimes, one of the microphones will have picked up a lot more of the ambient background noise than the other. Some microphones (like lav mics) can also pick up clothing rustles if the speaker was moving around during the recording. In general, the recording with less noise is preferable.
- How “echoey” is the recording? – Depending on the microphones that were used and their placement, some recordings may sound more “roomy” than others. In general, using the closer sounding recording with less echo is desirable (especially for “talking head” style interviews). There are cases where the more roomy sounding dialog could be appropriate (for instance, a narrative film where you want to recreate the natural sound of the space the dialog was recorded). You have to ask yourself if the dialog should sound “clean” or “natural” for your needs. A roomy sound is also less noticeable when the speaker is on screen. Voice-overs are typically as dry and clean sounding as possible.
There are times when no one microphone is superior in every measure. Use your best judgement for which recording provides the best quality for your particular project. This is also why it’s helpful to send all available recordings to a sound studio. They may find it’s easier to improve another mic than the one that was initially chosen.
In general, you want to use the same microphone recording for the entirety of a scene. That said, there may be times where one recording is superior to the other with the exception of one small bite (perhaps the lav mic had a big rustle over a particular line). Sometimes it’s best to swap in a different recording for that one line, rather than commit to an overall less desirable recording because of one hiccup in the better recording.
The ultimate goal of the dialog edit is to produce a seamless, natural sounding dialog track. Dialog recordings are often chopped up, spliced together, and spread out during the picture edit. This happens both for editorial and creative reasons. The dialog edit aims to smooth out those chopped up bites to make the edits “invisible” to the listener, and give the impression that what you hear is what was actually said.
Music Edit
The music edit is the process of smoothing out how each song or music cue will fade in, fade out, and transition. If music is specially composed for the project however, this step may simply be a check-up.
It is important to remember that picture is oftentimes more malleable than music. Music has a multitude of factors that make even a small edit noticable if not done correctly. Tempo, rhythm, instrument decay, and sustain are just a few factors that can throw off the pacing and groove of the music and the project as a whole.

It is often better to make slight alterations to picture when lining up a music track with visual cues, rather than try to make a forced music edit work during post audio. Picture editors will often create a temporary music edit. So, many of these potential problems will be solved before audio post. In any case, keep the lines of communication open so your audio editor can collaborate if need be.
Rough Mix
Once the dialog and music is edited, it’s common to do a rough mix of these elements along with any production audio or sound effects added by the picture editor. This step can help the sound designer see and hear the project as the editor did, albeit a much cleaner version. This also helps to make informed story-driven sound design decisions.
Sound Design
Sound design constitutes any elements post audio adds to enhance the soundtrack beyond the music and production audio. Sound design can be broken down into a few categories:
- Hard Effects – Sounds that are typically not recorded to picture (explosions, car engines, doors slamming)
- Foley – Sounds of the characters and the objects they touch (footsteps, cloth movement, prop effects)
- Backgrounds – Environmental ambiences (nature sounds, cityscapes, office murmurs)
- Emotional Effects* – Abstract effects out of the reality of the scene used to enhance emotional impact
*Emotional effects are the hardest to explain and are often easily confused with music. Many music compositions incorporate these types of effects as well (cymbal swells, eerie drones, etc). Non-literal sounds is another way of thinking about these effects. Trailer style booms and whooshes are some typical examples. Any sound effects that don’t fit into the reality of the scene, but rather are used for emotional impact, would fit into this category.
Final Mix
The final mix is where all the ingredients (dialog, voice over, music, and sound effects) are put together into a polished soundtrack. This is a complicated and delicate process, but some basic elements are as follows:
- Balancing the different elements of the soundtrack with each other (both through volume and the high/low frequency content of the elements)
- Establishing dynamic peaks and valleys in the mix (this can add excitement and reinforce a project’s pacing)
- Spreading elements throughout the stereo (or surround) field through panning (in the case of post production audio, this can also mean tracking objects on screen)
Mixing Formats
There are various formats a final mix can take, depending on the ultimate delivery needs. Stereo and 5.1 are some of the most common today but, VR (Virtual Reality) and AR (Augmented Reality) formats are on the rise.
Below is a quick breakdown of some key differences between popular formats:
Mono
– (a single audio channel) This format is mainly used for stems like voice over or dialog. Some public networks still require a mono mix for broadcast, and it is a good idea to make sure your mix is mono-compatible for playback on phones, smart home speakers, and other mobile devices.
Stereo Mix
– (2 audio channels) A left and a right speaker. The most common format outside of a theater environment. The vast majority of web and broadcast content is in the stereo format. All mixing facilities are set up to work in stereo.
5.1 Mix
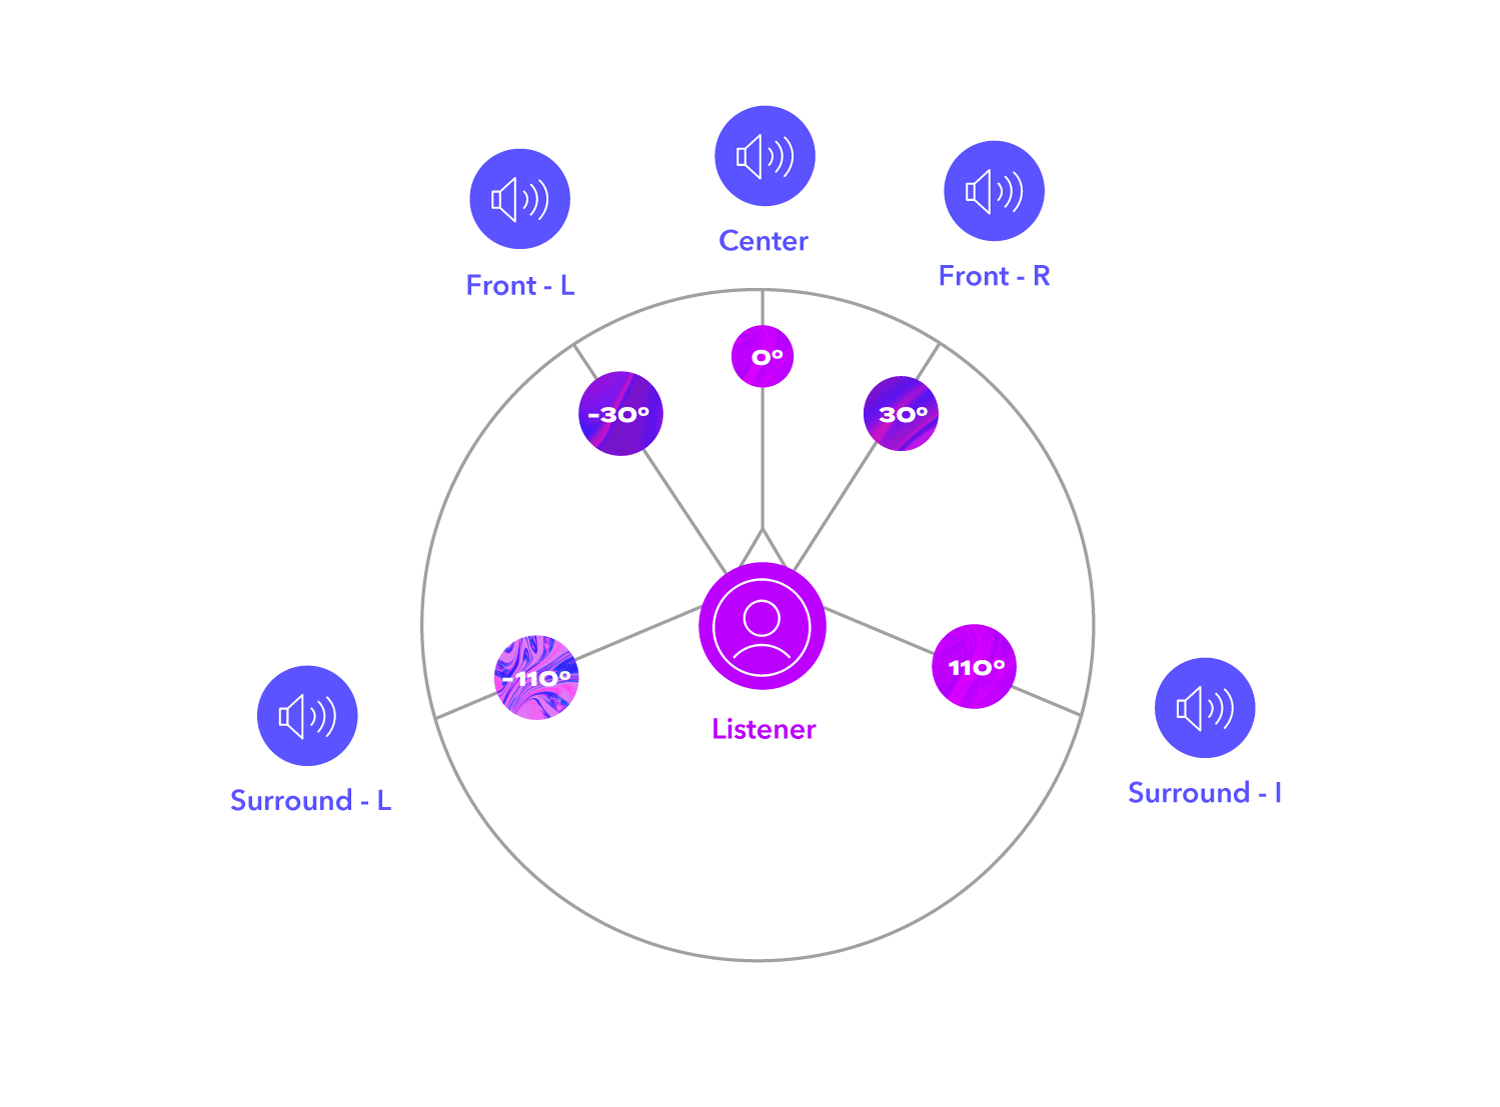
– (6 audio channels) Left, Center, Right, Left Surround (Ls), Right Surround (Rs), and Low Frequency Effects (LFE). The “5” in 5.1 represents the Left, Center, Right, Ls, and Rs channels. The “.1” represents the discrete low frequency effects channel. The 5.1 format is commonly used at film festivals, in broadcast television, and for many online streaming services. Most post audio mixing facilities are set up to work in 5.1. This format has been around for some time, but is highly immersive and remains one of the most popular surround formats.
7.1 Mix –
(8 audio channels) Left, Center, Right, Left Side (Ls), Right Side (Rs), Left Rear (Lr), Right Rear (Rr), and Low Frequency Effects (LFE). This format is used in most modern cinemas. Many, but not all, mixing facilities are set up to work in 7.1. This format shares many characteristics with the 5.1 format, but 7.1 provides more separation in the surround speakers around and behind the audience.
VR
– (played back on headphones) This is a new and developing field. Essentially, a virtual reality mix represents a full sphere of sound. VR video players have special decoders that tailor the audio experience depending on where the viewer is looking. For example, if a dog is barking to the right of the viewer’s perspective, the sound will come from the right side of the sound field. If the viewer turns to face the dog, the sound will come from the center of the sound field. It is similar to the way audio works in video games.
There are many ways to create virtual reality content. Some methods use a spherical video along with a 4 channel audio track, and some methods use special programming and are developed inside a game engine. Major VR platforms include Facebook, Youtube, Oculus, and Vive.
Dolby Atmos / DTS:X
-These are next generation spatial mixing formats where sounds are treated as distinct moving objects throughout a 3D space, rather than just panning between preset speakers. This allows for more consistent playback on different speaker arrays from 2 to 64 channels. Currently, these formats are most commonly used in big-budget, wide release films, and require a specialized cinema (or home theater) setup to properly playback. Mixing facilities require specialised systems to work in Dolby Atmos, so be sure to confirm a facility’s capabilities if this format is needed for your project.
Which format should I choose?
– Not all projects require the maximum possible number of speakers. Stereo is generally the default format. Many films also sound great in stereo, especially if they are primarily intended for internet playback. If you plan to present in a theater (like at a film festival or via major streaming service) expanding to 5.1 may help. Talk to your audio facility about your needs.
Review and Revisions
Many studios offer in-house reviews, but online reviewing methods are increasingly being used. Frame.io is a great online tool for reviewing an audio mix remotely. It allows the filmmaker to drop in notes at specific points in the timeline, streamlining communication with the mixing house.
Deliverables
Depending on the nature of the project, a variety of deliverables will be needed from the post audio team. The most important deliverable is, of course, the finished mix (possibly in multiple formats, as needed for the project). Stems/splits are also commonly required. These are isolated elements of the mix (dialogue, voice over, music, sound effects) that can be helpful for reversioning.
It is important for the filmmaker to communicate any unique needs. Post audio can streamline their workflow for each project if they know exactly what deliverables/formats are required before work begins.
Audio Specifications (aka Specs)
Specs are guidelines to ensure consistency in loudness across multiple programs, as well as to prevent undesired audio issues (clipping, digital pops, etc). This idea applies to broadcast television as well as to online streaming, although the technical specs are different for each one.
It is important to understand what environment your project will be playing in and what specs that environment may require. If ignored, a project may fail quality control in preparation for broadcast and be unable to air until addressed. This scenario is primarily applicable to broadcast television, where government regulations specify acceptable loudness levels (these specifications vary from country to country). Individual networks may also have unique spec requirements that post audio should be made aware of.
Even outside regulated environments like broadcast TV, there are spec recommendations for a variety of listening environments that can help ensure comfortable and consistent volume levels for listeners.
Measuring Loudness
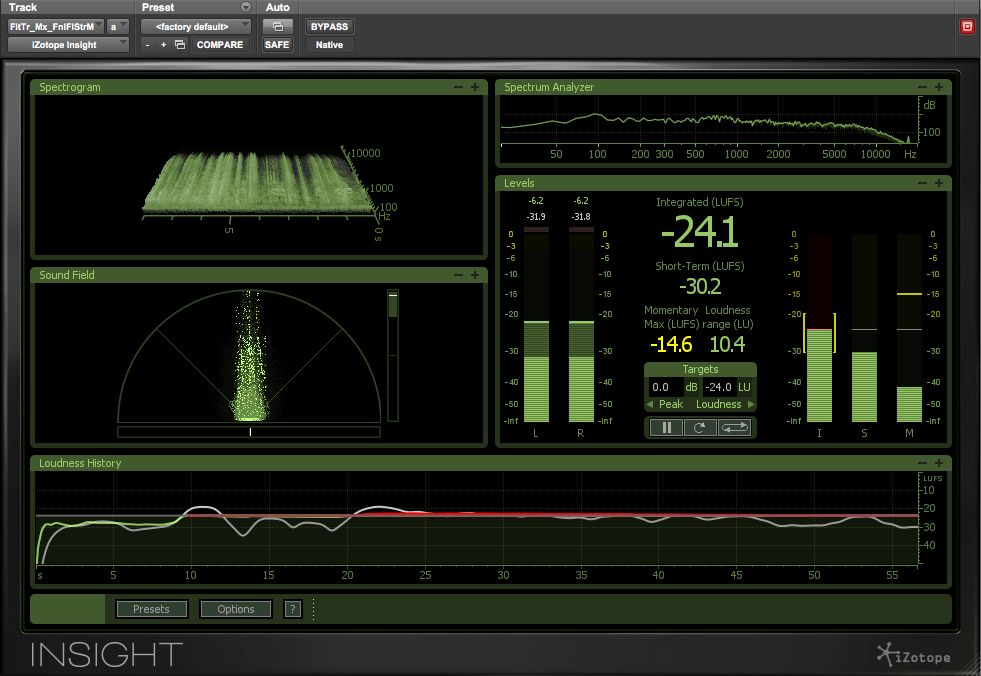
There are numerous loudness tools/plugins available that measure all aspects of a completed audio mix. The two most scrutinized measurements of any audio mix are the average loudness for the entire program, and the level the loudest sound.
Quick definitions for common measurements/tools used:
– This is a standardized unit of measurement of perceived loudness. It is used for finding the average loudness of an entire audio mix; this is referred to as Integrated LUFS/LKFS. LUFS and LKFS used to operate with slight differences, but today they are used synonymously.
– The measurement of the loudest moment of the mix.
– A specialized tool/plugin that allows the user to set a loudness ceiling that the audio cannot exceed. True Peak Limiters are sometimes confused with “Brick Wall” limiters. In short, True Peak Limiters are much more precise.

Loudness Recommendations
Below are some general recommendations for a variety of common listening environments. As mentioned earlier, if your project is playing in an environment that may have unique and strict loudness guidelines, make sure you are aware of them and communicate this with your post audio team.
– A common target for web mixes are Integrated LUFS/LKFS of -16db (+1/-1db) and True peak of -1db. There are no strict regulations on web mixes, but these recommendations should yield a product that is consistent with other web content, while still leaving room for a dynamic and engaging mix.
– Television is arguably the strictest environment regarding loudness. In the US, typical measurements are -24db (+1/-1db) Integrated LUFS/LKFS and -10db True Peak (some networks provide a bit more wiggle room, but these recommendations should cover all the bases). Different countries have different regulations, so be sure to check what measurements are appropriate for your project.
Some networks also require specific splits or versions of the final mix. You can usually find a network’s audio technical specifications online, or by requesting that information from the network directly.
– There is no standard or regulated loudness standards for films. Films are ideally mixed in precisely calibrated rooms that allow for loudness to be mixed by ear. In other words, you are free to use the full dynamic range that digital audio can offer, as long as the film is mixed by an engineer with an accurate frame of reference. It is also wise to keep in mind the venue your film will be played in. For instance, many film festivals have a surround system. In these cases, it’s important to know what format that festival requires/accepts (Stereo, 5.1, 7.1, etc).
– There are currently no standards for loudness in VR, but the Web loudness levels mentioned above are a decent starting point. There is a variety of virtual reality formats, each with its own unique spec requirements. It is important to read up on these for whichever format you are using. Youtube VR and Facebook 360 are some of the most popular VR formats (spec requirements for both of these can be found online).
One final note. It is common to request multiple final mixes on films. If your film is to be shown at a film festival with 5.1 surround sound as well as online, you may want to request a separate mix for each. In addition, while film festivals may offer 5.1 surround, they rarely require it. Your film may work better in a stereo format. It all depends on the sonic needs of your project (for wide theatrical releases however, a surround format is usually universally required).
In short, different environments have different optimal formats and loudness settings. Communicating your needs will help post audio provide the best possible mixes.
Stems/Splits
Stems and Splits are interchangeable terminology. They both refer to individual elements of a final mix that have been split out into their own files (voice over, dialogue, music, sound effects, etc). Stems/splits are helpful for processes like language versioning or future repurposing of content. For example, by using an MDE split (explained below), editors can easily swap out an English voice over for a Spanish voice over without recreating the whole mix. It is important to specify exactly what stems/splits are needed with post audio so they can best provide the needed deliverables.
The following is a list of common deliverables to request from post audio:
01
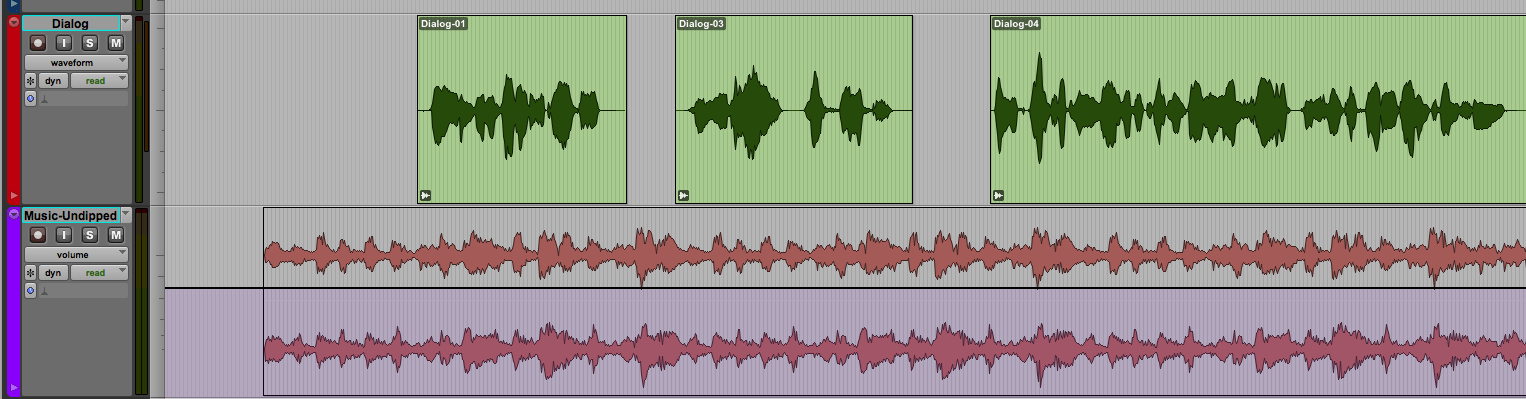
Dipped Music – Contains any volume automation added to it during the mix. Dipped music represents the music exactly as it is in the full mix.
02
Undipped Music – Does not contain any volume automation added during the mix. This can be helpful if you need to remix the project later due to major changes, or if the project needs to be repurposed elsewhere or into a language that requires more or less time to say the same thing.